
Milk Steaming for Beginners! Soar to PRO LEVEL with these Tips.
Welcome to the world of milk steaming, where the delicate alchemy of transforming simple milk into velvety microfoam can elevate your coffee creations to extraordinary heights. Whether you’re a curious coffee enthusiast or an aspiring barista, mastering the art of milk steaming is a pivotal step towards creating the perfect latte, cappuccino, or macchiato. But fear not, for this journey from beginner to pro is an exciting one, filled with discoveries, trials, and triumphs.
In this guide, we’ll demystify the process of milk steaming, breaking it down step by step, from the foundational basics to the advanced techniques that will take your skills to the next level. We understand that starting out might seem a bit overwhelming, but with the right knowledge and a touch of practice, you’ll soon be creating luscious, velvety milk foam that will leave you and your guests in awe.
Prepare to embark on a journey where you’ll learn the science behind milk proteins, discover the importance of milk temperature, and explore the nuances of various steaming techniques. By the time you reach the end of this guide, you’ll not only be a confident milk steamer but also possess the tools to experiment and create your own signature drinks.
So, whether you’re looking to impress your friends with your coffee art skills, or you aspire to join the ranks of skilled baristas, fasten your seatbelt and get ready to soar from a milk-steaming novice to a true pro. Let’s dive into the world of milk steaming and unlock the secrets to crafting exceptional coffee experiences!

Start with Cold Milk.
Learning milk steaming for beginners it’s important you always use cold milk when steaming. Cold milk is denser and holds more air, which makes it easier to create micro foam. Micro foam is essential for latte art and for creating velvety milk texture.
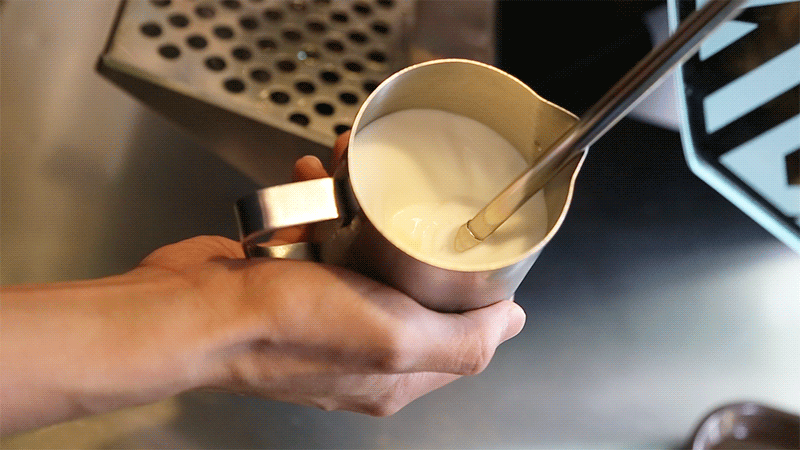
Utilizing a Pitcher with a Thermometer: The Precision Behind Perfect Milk Steaming!
When it comes to mastering the art of milk steaming, precision is key. A pitcher with a thermometer is an invaluable tool that can make all the difference in achieving consistently excellent results. This combination allows you to monitor and control the temperature of the milk as it steams, ensuring that you hit that sweet spot where creamy microfoam meets ideal temperature.
Why Use a Pitcher with a Thermometer?
- Temperature Control: The temperature at which you steam your milk greatly influences its texture and flavor. Too hot, and you risk scalding the milk, resulting in a burnt taste and undesirable texture. Too cool, and your milk won’t achieve the desired frothiness. A thermometer helps you hit that Goldilocks zone where the milk is heated to the perfect range—usually around 150-155°F (65-68°C) for most espresso-based drinks.
- Consistency: Consistency is crucial in the world of coffee. Using a thermometer ensures that you can replicate your results time and again. This is especially important if you’re making multiple drinks, as each one should be as perfect as the last.
- Texturing Microfoam: Achieving microfoam—tiny, velvety bubbles—is a hallmark of well-steamed milk. A thermometer-equipped pitcher lets you control the steam wand more accurately, which means you can stretch the milk to create the right amount of foam while maintaining proper temperature.
How to Use a Pitcher with a Thermometer:
- Choose the Right Pitcher: Opt for a milk-steaming pitcher with a built-in thermometer or a clip-on thermometer. These designs allow you to monitor the temperature without constantly removing the thermometer from the milk.
- Pour Cold Milk: Begin by pouring cold milk into the pitcher. The amount of milk you use depends on the drink you’re making, but it’s recommended to fill the pitcher around one-third full to allow room for expansion during steaming.
- Submerge the Thermometer: Make sure the thermometer probe is properly submerged in the milk. This ensures accurate temperature reading.
- Steam with Precision: Insert the steam wand into the milk, aiming slightly off-center to encourage proper swirling. Turn on the steam wand and monitor the temperature as the milk heats. You’ll want to hear a gentle hissing sound as the milk stretches and froths.
- Watch the Temperature: As the temperature approaches the desired range, pay close attention. Turn off the steam wand when the thermometer reads just below your target temperature. The residual heat will continue to raise the temperature slightly.
By incorporating a pitcher with a thermometer into your milk steaming routine, you’ll gain the ability to fine-tune your technique and create consistently outstanding coffee beverages. Remember, practice makes perfect, and with time, you’ll intuitively know when to stop steaming based on temperature and the milk’s texture. Elevate your coffee creations and impress yourself and your guests with the newfound precision in your milk steaming process!
Maintaining Excellence: The How and Why of Cleaning Your Milk Steaming Equipment.
In the world of coffee craftsmanship, cleanliness isn’t just a nicety—it’s a non-negotiable requirement. Your milk steaming equipment, including steam wands, frothing pitchers, and thermometers, requires regular and thorough cleaning to ensure that each cup you create is a masterpiece of flavor, texture, and safety.
Why Clean Your Equipment?
- Flavor Integrity: Residue from old milk can impart unwanted flavors to your freshly steamed milk. Keeping your equipment clean ensures that the delicate nuances of your coffee blend shine through in every sip.
- Hygiene: Milk is a breeding ground for bacteria if left uncleaned. Regular cleaning prevents the growth of harmful microorganisms that can jeopardize both your health and the health of your customers if you’re in a professional setting.
- Performance: Dirty equipment can hinder the proper functioning of steam wands and thermometers. Residue buildup can affect the quality of your microfoam and disrupt the accuracy of temperature readings.
- Aesthetics: In a café setting, cleanliness is part of the overall experience for customers. Clean equipment not only contributes to a more visually appealing atmosphere but also instills trust and confidence in the quality of your offerings.
How to Clean Your Equipment:
- After Each Use:
- Steam Wand: Immediately after steaming milk, purge the steam wand to expel any leftover milk and moisture. Wipe the wand with a clean damp cloth.
- Pitcher: Empty the remaining milk from the pitcher and rinse it with warm water. For thorough cleaning, use a gentle brush to remove any milk residues.
- Thermometer: Remove the thermometer from the pitcher and wash it with warm, soapy water. Be cautious not to immerse the entire thermometer in water if it’s not waterproof.
- Daily Cleaning:
- Disassemble: If your steam wand can be disassembled, remove any detachable parts and soak them in warm, soapy water to remove milk buildup.
- Clean the Steam Wand: Using a steam wand brush or pipe cleaner, gently scrub the inside of the steam wand to remove any residual milk.
- Sanitize: Use a food-safe sanitizer to clean the steam wand’s exterior and any other parts that come into contact with milk. Rinse thoroughly afterward.
- Weekly Cleaning:
- Deep Clean Pitchers: Soak frothing pitchers in a mixture of warm water and a mild detergent. Use a soft brush to scrub off any milk residue. Rinse thoroughly and allow them to air dry.
- Thermometer Calibration: If your thermometer is adjustable, make sure it’s correctly calibrated. Follow the manufacturer’s instructions to ensure accurate readings.
Remember, consistency is key. By incorporating a regular cleaning routine into your milk steaming practice, you not only preserve the quality of your coffee creations but also extend the lifespan of your equipment. Whether you’re a home barista or a professional, treating your equipment with care and respect translates into consistently remarkable coffee experiences that will leave a lasting impression on every palate that sips your brew.
Purge the Steam Wand: Maintaining Purity and Performance in Milk Steaming.
Purging the steam wand is a critical step in the milk steaming process that ensures your coffee creations maintain their exceptional quality. This simple yet important practice helps eliminate any residual milk and moisture that may be present in the steam wand after frothing milk. Understanding why and how to properly purge the steam wand will enhance the flavor, texture, and hygiene of your beverages.
Why Purge the Steam Wand?
- Flavor Preservation: Leftover milk residue from previous steaming sessions can affect the flavor of your next drink. By purging the steam wand, you prevent unwanted flavors from transferring to your freshly steamed milk.
- Texture Consistency: Any moisture or milk left inside the steam wand can alter the texture of your microfoam, leading to inconsistent foam quality in your beverages.
- Hygiene: Milk is a breeding ground for bacteria, and a moist environment within the steam wand can facilitate bacterial growth. Properly purging the steam wand helps maintain a sanitary workspace and ensures the safety of your beverages.
How to Purge the Steam Wand:
- Before Steaming:
- Ensure that the steam wand is clean and free of any milk residue from previous use.
- Position the steam wand over a sink or drip tray to catch the expelled liquid.
- Purging Process:
- With the steam wand pointing downward, open the steam valve for a few seconds. You should hear a hissing sound as steam is released from the wand.
- This action removes any residual moisture or milk from the steam wand’s interior and exterior surfaces.
- Allow steam to flow until you no longer see any traces of milk or water coming out of the wand.
- Wipe Clean:
- Once you’ve purged the steam wand, use a clean damp cloth to wipe the exterior of the steam wand to remove any remaining moisture.
By consistently purging the steam wand before each steaming session, you ensure that your milk is free from unwanted flavours and that you’re working in a hygienic environment. This small but impactful step contributes to the overall excellence of your coffee creations, allowing the true flavours of your coffee to shine through and providing a consistent and delightful experience for every sip.


Position the Steam Wand Correctly.
Why Purge the Steam Wand?
- Flavor Preservation: Leftover milk residue from previous steaming sessions can affect the flavor of your next drink. By purging the steam wand, you prevent unwanted flavors from transferring to your freshly steamed milk.
- Texture Consistency: Any moisture or milk left inside the steam wand can alter the texture of your microfoam, leading to inconsistent foam quality in your beverages.
- Hygiene: Milk is a breeding ground for bacteria, and a moist environment within the steam wand can facilitate bacterial growth. Properly purging the steam wand helps maintain a sanitary workspace and ensures the safety of your beverages.
How to Purge the Steam Wand:
- Before Steaming:
- Ensure that the steam wand is clean and free of any milk residue from previous use.
- Position the steam wand over a sink or drip tray to catch the expelled liquid.
- Purging Process:
- With the steam wand pointing downward, open the steam valve for a few seconds. You should hear a hissing sound as steam is released from the wand.
- This action removes any residual moisture or milk from the steam wand’s interior and exterior surfaces.
- Allow steam to flow until you no longer see any traces of milk or water coming out of the wand.
- Wipe Clean:
- Once you’ve purged the steam wand, use a clean damp cloth to wipe the exterior of the steam wand to remove any remaining moisture.
By consistently purging the steam wand before each steaming session, you ensure that your milk is free from unwanted flavours and that you’re working in a hygienic environment. This small but impactful step contributes to the overall excellence of your coffee creations, allowing the true flavours of your coffee to shine through and providing a consistent and delightful experience for every sip.
Texture the milk by introducing air into the milk. To do this, lower the steam wand slightly, so that it’s just below the surface of the milk. Hold the pitcher at an angle, so that the milk spins around the jug, and the steam wand creates a vortex. As you hear a hissing sound, keep introducing air into the milk until it reaches the desired temperature.

Position the Steam Wand Correctly.
Create Micro foam.
Macrofoam, the silky and velvety texture created by steaming milk, is a barista’s art form that transforms coffee into a luxurious experience. This delicate froth is the foundation of beverages like lattes, cappuccinos, and flat whites. Let’s dive into the process of creating microfoam that’s both visually appealing and adds a creamy, delightful dimension to your coffee.
Ingredients:
- Fresh, cold milk (whole milk or milk alternatives like soy, almond, oat, etc.)
Equipment:
- Espresso machine with a steam wand
- Frothing pitcher
Steps to Create Microfoam:
- Select the Right Pitcher:
- Choose a frothing pitcher that’s appropriate for the amount of milk you’re steaming. The pitcher should have enough space to accommodate the milk’s expansion during steaming.
- Cold Milk:
- Start with cold milk, preferably straight from the refrigerator. Cold milk provides better control during the steaming process and helps achieve the desired texture.
- Position the Steam Wand:
- Submerge the steam wand into the cold milk at an angle, positioning it just below the surface.
- Start Steaming:
- Turn on the steam wand and allow it to fully open to release steam.
- Initially, you’ll hear a distinct hissing sound as the steam interacts with the cold milk.
- Stretching Phase:
- During the first few seconds, focus on stretching the milk by keeping the steam wand near the surface. This incorporates air into the milk and creates small bubbles.
- Proper Swirling:
- As the milk begins to expand and foam forms, gently lower the steam wand deeper into the milk to continue heating and texturing.
- The milk should start swirling naturally due to the angle of the steam wand. This helps ensure even texture throughout.
- Temperature Control:
- Continuously monitor the temperature using a thermometer in the pitcher. Aim for a milk temperature of around 150-155°F (65-68°C).
- Shut Off Steam Wand:
- Once the milk reaches the desired temperature, turn off the steam wand. Immediately remove the pitcher from the steam wand to prevent oversteaming.
- Tap and Swirl:
- Gently tap the pitcher on a surface to remove any larger bubbles.
- Give the pitcher a quick swirl to integrate the milk and foam further.
- Pouring:
- Hold the pitcher at a slight angle and start pouring the milk into your espresso shot or coffee mug.
- Adjust the pouring speed to control the ratio of foam to milk as desired.
Remember that creating microfoam takes practice. Each milk type, espresso machine, and steam wand behave differently, so don’t be discouraged if you don’t achieve perfection right away. Over time, you’ll develop a sense of timing, positioning, and technique that works best for your setup. With dedication and patience, you’ll be able to consistently create beautiful, velvety microfoam that elevates your coffee creations to the next level.
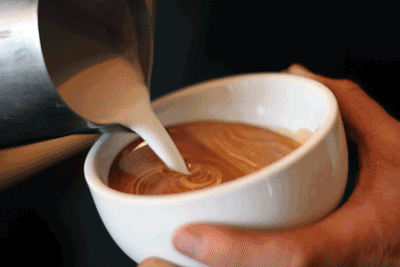
The Art of Milk Pouring: Adding the Finishing Touch to Your Coffee Creations.
Now that you’ve created the perfect texture and micro foam, it’s time to pour the milk into the espresso. To do this, hold the pitcher close to the espresso and pour the milk in a steady stream. As the milk enters the espresso, move the pitcher slightly back and forth to create latte art.
Pouring steamed milk is the final step in the journey to creating a visually stunning and delicious coffee beverage. Whether you’re crafting a latte with a delicate heart design or a cappuccino with intricate swirls, milk pouring is where your creativity takes center stage. Let’s delve into the techniques and tips for achieving elegant milk patterns that turn your coffee into a work of art.
Equipment Needed:
- Steamed milk with microfoam
- Espresso shot or brewed coffee
- Clean, dry milk frothing pitcher
Steps for Milk Pouring:
- Prepare Your Coffee:
- Begin by pulling a shot of espresso or brewing a cup of your preferred coffee.
- Select the Right Pitcher:
- Choose a frothing pitcher that complements the size of the drink you’re making. This allows for precise control during pouring.
- Hold the Pitcher:
- Hold the handle of the pitcher with one hand and use your other hand to steady the spout. This provides better control over the pour.
- Choose Your Pouring Technique:
- There are various pouring techniques, each resulting in different patterns. Some popular techniques include:
- Heart: Pour the milk gently into the center of the cup, then quickly move the pitcher side to side as you draw a line through the center to create the top of the heart.
- Rosetta: Start by pouring a small stream of milk into the center of the cup. As the cup fills, move the pitcher side to side while simultaneously moving it back and forth to create a leaf-like pattern.
- Tulip: Similar to the rosetta, but instead of moving back and forth, create a central line through the pattern by raising the pitcher slightly.
- There are various pouring techniques, each resulting in different patterns. Some popular techniques include:
- Control the Flow:
- Control the flow of milk by adjusting the height at which you hold the pitcher and the angle of the pour. A lower pour creates a more defined pattern, while a higher pour disperses the milk for a softer design.
- Maintain Steady Hands:
- Keep your hands steady as you pour, using your wrist to control the movement. A gentle, consistent pour is key to creating clean lines.
- Practice, Practice, Practice:
- Milk pouring is an art that requires practice. Don’t be discouraged if your first attempts aren’t perfect. Experiment with different techniques and adapt them to your pouring style.
- Admire Your Creation:
- Once you’ve completed your pour, take a moment to appreciate your work of art before presenting it to yourself or your customer.
Remember, milk pouring is all about finding your style and refining your skills over time. Each pour is a unique expression of your creativity, so don’t hesitate to experiment and develop your signature patterns. With practice and dedication, you’ll be able to add a stunning finishing touch to your coffee creations that will leave a lasting impression on anyone lucky enough to enjoy them.

In conclusion, milk steaming is an essential skill for creating a perfect espresso-based drink. By following these ten tips, beginners can learn the techniques and tools needed to steam milk like a pro. Remember to start with cold milk, use a pitcher with a thermometer, and clean your equipment thoroughly.
Selecting the Perfect Milk for Exceptional Coffee Creations.
When it comes to creating exquisite coffee beverages, the type of milk you choose plays a significant role in flavour, texture, and overall experience. The characteristics of different milk types—dairy and plant-based—can influence the taste and appearance of your coffee. Let’s explore the options and factors to consider when selecting the best milk for your coffee making endeavors.
Factors to Consider:
- Fat Content:
- Dairy milk with higher fat content, like whole milk or cream, can create a richer and creamier texture in your coffee. It’s an excellent choice for achieving lattes and cappuccinos with a luxurious mouthfeel.
- Creaminess and Foamability:
- Milk with a higher protein content, such as whole milk, tends to produce creamier and more stable microfoam when steamed. This is crucial for latte art and achieving that velvety texture.
- Taste Profile:
- Different milk types have distinct flavour profiles. For instance, whole milk has a rich and creamy taste, while skim milk is lighter. Plant-based milks can range from nutty to sweet, so consider how the milk’s flavour complements your coffee blend.
- Allergies and Dietary Restrictions:
- If you or your customers have dairy allergies or dietary preferences, plant-based milk alternatives (like almond, soy, oat, or coconut milk) can provide a great alternative.
- Latte Art:
- If you’re passionate about creating latte art, opt for milk that steams well and creates stable microfoam. This allows you to sculpt intricate patterns on the coffee’s surface.
Milk Options:
- Whole Milk:
- Creamy and rich, whole milk is a classic choice that’s often preferred for lattes and cappuccinos. It creates stable microfoam and complements the flavor of coffee well.
- 2% (Reduced Fat) Milk:
- Offering a balance between creaminess and lower fat content, 2% milk is a versatile choice suitable for various coffee beverages.
- Skim Milk:
- With lower fat content, skim milk produces a lighter texture. It’s a suitable choice for those seeking a lower-calorie option.
- Cream:
- Cream is perfect for those looking for a truly indulgent coffee experience. It creates a thick, velvety texture and adds richness to your drinks.
- Plant-Based Milks:
- Almond, soy, oat, coconut, and other plant-based milks offer various flavors and textures. Experiment to find the one that complements your coffee’s profile.
Experimentation is Key:
Selecting the best milk is ultimately a matter of personal preference and the desired outcome of your coffee. Don’t hesitate to experiment with different milk types to discover what complements your favourite coffee blends and brewing methods. Whether you’re crafting a traditional latte or exploring innovative dairy-free alternatives, the right milk will elevate your coffee creations and offer a memorable experience to every sip.


Types of Milk for Coffee Making:
Whole Milk Whole milk, also known as full-fat milk, is the most common type of milk used in coffee making. It has a rich, creamy texture that complements the flavour of coffee well. The fat content in whole milk ranges from 3.25% to 3.5%, which makes it an excellent choice for espresso-based drinks such as lattes and cappuccinos.
2% Milk 2% milk, also known as reduced-fat milk, is a lower-fat alternative to whole milk. It has a creamier texture than skim milk but is less rich than whole milk. The fat content in 2% milk ranges from 1.5% to 2%, which makes it a good option for those who prefer a lighter coffee flavour.
Skim Milk Skim milk, also known as fat-free milk, is the lowest-fat milk available. It has a watery texture and a slightly sweet taste. The fat content in skim milk ranges from 0% to 0.5%, which makes it an excellent choice for those who are watching their fat intake but still want to enjoy a creamy cup of coffee.
Soymilk Soy milk is a popular alternative to cow’s milk for those who are lactose intolerant or vegan. It has a creamy texture and a slightly nutty flavour that can complement the taste of coffee. However, some people find that soy milk can be too sweet for coffee and may overpower the coffee’s flavour.
Almond Milk Almond milk is another popular alternative to cow’s milk. It has a nutty flavour and a slightly sweet taste. However, almond milk can be quite thin, which can affect the texture of the coffee. It’s also important to note that some brands of almond milk contain added sweeteners, which can make the coffee taste overly sweet.
Coconut Milk Coconut milk is a creamy and slightly sweet alternative to cow’s milk. It has a tropical flavour that can complement the taste of coffee well. However, coconut milk can be quite thick, which can affect the texture of the coffee. It’s also important to note that coconut milk contains more saturated fat than other types of milk, so it may not be the best choice for those who are watching their fat intake.
Oat Milk Oat milk is a popular alternative to cow’s milk for those who are lactose intolerant or vegan. It has a slightly sweet taste and a creamy texture that can complement the taste of coffee well. However, oat milk can be quite thin, which can affect the texture of the coffee. It’s also important to note that some brands of oat milk contain added sweeteners, which can make the coffee taste overly sweet.
Can Reduced Fat Milk be as Good as Normal Milk for Coffee?
Reduced-fat milk can be just as good as normal milk for coffee making, depending on personal preference. The fat content in milk affects the texture and taste of the coffee, so using reduced-fat milk can result in a lighter and less creamy coffee. However, some people may prefer the taste of reduced-fat milk, as it allows the coffee’s flavour to shine through.
How Does Soy and Other Milks Affect the Coffee Flavour?
When it comes to adding milk to coffee as a new barista learning milk steaming for beginners there are a wide variety of options available, including soy milk, almond milk, oat milk, and more. Each type of milk can have a slightly different effect on the flavour of the coffee.
Soy milk, for example, tends to have a creamy and slightly nutty flavour that can complement the bitterness of coffee. However, soy milk can also be quite thick and may overpower more delicate coffee flavours. Some people also find that soy milk can leave a slight aftertaste that lingers in the mouth.
Other non-dairy milks, such as almond or oat milk, tend to have a sweeter taste than soy milk. These milks may not complement the bitterness of coffee as well as soy milk, but they can still add a pleasant flavour and creaminess to the beverage. It’s worth noting that the specific brand and type of milk used can also have a significant impact on the overall flavour of the coffee.

Ultimately, the best way to determine how different types of milk affect the flavour of your coffee is through experimentation. Try a variety of milks and see which ones you prefer with different types of coffee.
Author.
Brendon McAliece is a multi-lingual expat who brings over three decades of flight simulator/PC building experience as well as over two decades of real-world jet fighter experience as a weapons/egress technician. He holds a sport pilot certificate giving him real-world flying experience. Hi travels have taken him from Europe to the Middle East, Asia and his home of Australia. He has a passion for travel, languages, Flight simulation as well as Guitaring and Coffee. You can read more in his blogs below.

Learn more @
DreamingGuitar.com – DreamingCoffee.com – LetsFlyVFR.com
Home – Blog – Shop – About
As an Amazon affiliate I may earn on qualifying sales.